Now we are ready to actually move all of the WordPress install files to your webserver. You will need a FTP program to do this. The best two to use (if you don’t own a commercial version of ftp software) are Filezilla for Windows, or Cyberduck for OS X. Both are free open source programs and can be easily downloaded and installed.
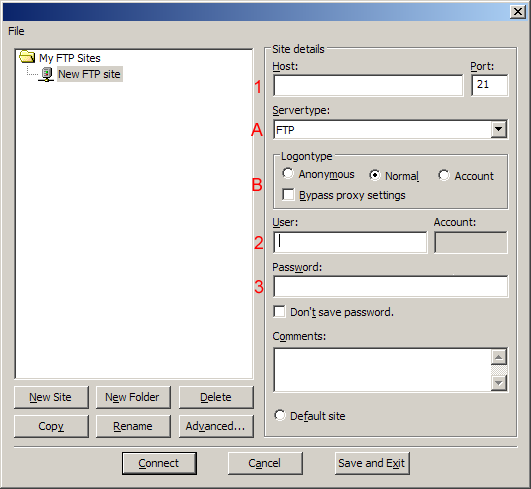
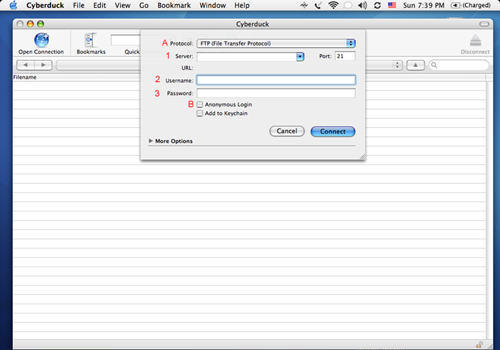
Once you have downloaded and installed the FTP software we need to set it up to connect to your web server. Usually all you need to input is the name of your website (1), your username (2) (usually the same one as the one to log into your website’s control panel), and your password (3) (again, typically your website’s control panel password). (A) is normally fine set to “FTP”, but in a limited number of cases it may need to be set to “SFTP” if your server has a special higher security version of FTP set up and running. (B) needs to be set to “normal” for filezilla and “anonymous login” should not be checked in Cyberduck.
Filezilla:
Cyberduck:
File Transfers
Once you input the proper information you can then connect to the file system of your website. Depending on what type of server you are on (Linux or Windows) your site may be in a directory called “www†or “home†or some other name that sounds similar. Now you need to think about where you want your site to be. Will your WordPress site be the thing that people see when they type www.YourUrl.com? If so then the files will need to be placed in the “root†folder of your web server (this is directly in the www or home folder mentioned above). Move the files there (not the entire WordPress folder, select just the files and the sub folders) from the uncompressed WordPress download folder on your computer. If your WordPress site will be a sub-site, or a branch off your main site, you can then simply drag the entire WordPress uncompressed folder to your website, then rename the folder.
To move around the file system of your server with Filezilla, double click the folder you want to open to move into that folder, to move back a folder, double click on the “..” entry at the top of the folder listing. To move around the folder system in Cyberduck click a folder to move into it; you can use the arrows to the left of the folder name box to move back up a folder level.
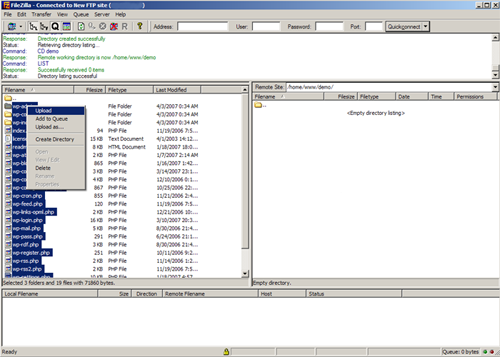
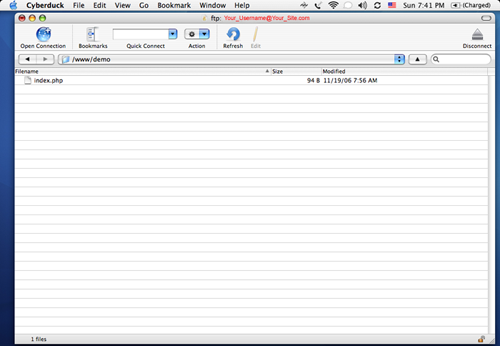
Once you have determined where the files will go we need to move them to your web server. All this normally requires is to select the files you want to add and either drag them to the web server files area folder you want them in, or select the files and then select “uploadâ€. [Examples show uploads to a sub folder called “Demo”, to make a root install upload to the WWW folder]
Filezilla:
Cyberduck:
File Permissions
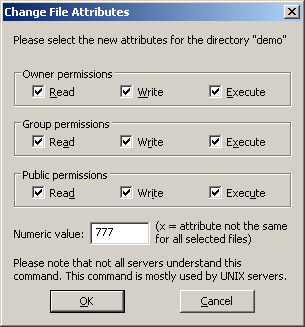
While we are talking about moving files I want to mention another important element of the files that you place on your website: their file permissions. On a personal system you rarely have to deal with the idea of setting the file permissions on a file, but on a webserver you want to make it such that certain files can’t be messed around with by the visitors to your site, so those files need to be “locked†down. By default most FTP clients move files to your site with this locked status as the default, its number association is 644. (note: honestly, don’t worry about why the numbers are as they are, all you really need to know are the few different number combinations you need to set files, which I’ll explain) You can see this permission status by selecting a file on the webserver and looking at it’s properties on info page. If you get a message at some point during your usage of WordPress that a certain file can’t be accessed due to it having restricted file permissions, you may have to go and change it using your FTP client.
An example of this is your Theme files. If you go to the wp-content/themes/ folder area this is where all of the optional theme files for WordPress are kept. These are the files that determine how your site looks. WordPress has a built in theme editor, but to be able to edit the files they have to be set to a lower permission level than the default 644 setting. To do this you need to go into the folder of the theme you want to use and select each file you may want to edit (at first it’s probably good to select all of the files there except image files) and set their permission level to 666. At this point it’s also a good idea to go to the folder wp-content and create a new folder in it called “uploads†and set it’s permissions to 777 (yes, folders have permission levels also). This “uploads†folder is where WordPress places the images and other stuff you use when you post a blog entry—for some reason it’s not actually created during the install of WordPress.
Memory Time for wp-config.php
Now I will remind you of what we talked about earlier. Look at the listing of your files in the main WordPress folder on the web server and make sure that the file wp-config.php is actually called that on your webserver. If it is not called that, rename it to make it that filename. (note: the file wp-config-sample.php is not needed by WordPress and doesn’t need to be moved to your server, don’t get confused and rename this file by mistake–you can delete it–we want to make sure that wp-config.php isn’t wp-config.php.txt in this step) Leave this file with its default permission level of 644.
Now that we have your files in place, we can do the database install and log into your new WordPress website!
My brother would appreciate this website. We were recently speaking about this. lol